Education + RoomSketcher = Excellent Match
Whether you are a teacher or a student, RoomSketcher is a great app to use for schools to create floor plans and home designs. Best of all - you don't have to be tech savvy to get impressive results.

“What I like about RoomSketcher is that it’s a very intuitive and easy program to use with lots of opportunities. My students love the program, mainly because of the user friendliness and all the creative opportunities.”
Stian Abrahamsen
Arts & Craft Teacher, Norway
Why RoomSketcher Is The Best Floor Plan and Home Design Software for Educational Use

Plan a Room or an Entire Home
With RoomSketcher, you have an easy tool to plan a property or a house. Use the app to plan an entire home layout or a room design. Decide on furniture, colors and materials, and where to place windows and doors. Try out your ideas and find the best room and furniture layouts.

Create Your Interior Design Concept
With RoomSketcher, it’s easy to take your ideas and create impressive room designs with stunning 3D visuals. Experiment with colors, wallpapers and furniture to create your own unique vibe. Showcase interior design concepts, and create stunning project presentations, at the click of a button.

Create Floor Plans to Find Best Layout
Play around with various furniture layouts to find and suggest optimal solutions. Make different alternatives and present options to pretend clients. With RoomSketcher it's easy to share and visualize your projects with 2D and 3D Floor Plans, 3D Photos and more.

Try Out Your Design Ideas
RoomSketcher is the ultimate tool for you to create and present your design ideas. It’s quick and easy to draw up a floor plan, design your vision and make changes as you go. With a Pro subscription you can access the full product library, the options are endless. Perfect for building your portfolio and student presentations.
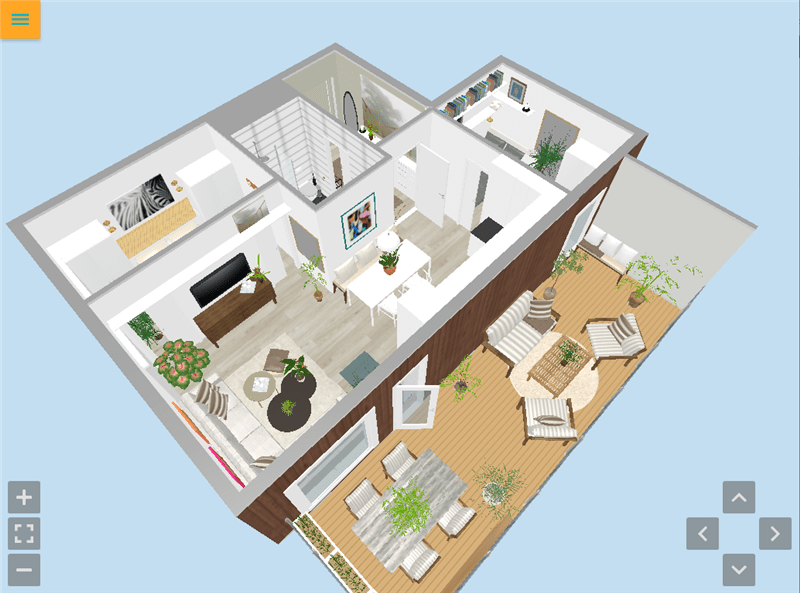
Visualize Your Project in 3D
Draw in 2D and visualize in stunning 3D. The 3D visualization makes you able to clearly see your designs as you draw, while also being the perfect way to present the finished result. RoomSketcher is so easy to use that the whole class can enjoy using the app, and get the same stunning results.

Educate Students About Space Planning
Understanding space planning can be challenging. With RoomSketcher, teachers have a great tool on hand that students love using.
Get your students to draw a 1-bedroom apartment, kit it out with a kitchen and bath and see what else they have room for. With true-to-size furniture, students get a realistic visual on how much room is available once all the essentials are placed out.
5 Steps to Floor Planning With RoomSketcher

Step 1: Create a Floor Plan of the Room
Measure the room you are designing and then draw it up in the RoomSketcher App. Handy wall measurements make it easy to get the exact lengths.
Not sure how to get your project going? Start with the basics - learn how to draw a floor plan.

Step 2: Add Doors, Windows, Stairs and Fixed Furniture
Next, add doors, windows, and stairs. Measure windows to get the correct width, and easily adjust the sizes in the software. Set the height above floor for windows, and choose the correct door swing angle. To complete the basic layout of your project, add the fixed furniture, like toilets, showers, kitchen cabinets and sinks to your floor plan.
Spend a little time at this stage so you are sure you have your foundations right. This makes the design process easier when you get to the fun stuff.

Step 3: Start Furnishing and Decorating
Now that your foundation is ready, it’s time to start designing. Add a wall color, or how about wallpaper? Add your flooring, and then start furnishing and decorating. With RoomSketcher Pro, you get access to more than 10.000 items. Instant 3D Snapshots lets you visualize your design as you go.
Create copies of the room and try different layouts to see what works best. Try different styles to get several design options you can present to your students or teachers.

Step 4: Finalize Your Layout and Present With Floor Plans
With a Pro subscription you can generate high-quality 2D and 3D Floor Plans at the touch of a button.
Add measurements and annotations to your floor plans with ease. Then print and download to scale in metric or imperial scales and in multiple formats such as JPG, PNG, and PDF.

Step 5: Create Beautiful 3D Renderings
Buy Pro to visualize your design ideas in impressive 3D. Just use the virtual camera in the software to click and generate impressive 3D Photos and 360 Views. You can even walk around your design in interactive Live 3D. Live 3D updates instantly if you make a change to your design, with no waiting or downtime.
Frequently Asked Questions
The RoomSketcher App works on Windows and Mac computers, as well as iPad and Android tablets. Download the RoomSketcher App to as many devices as you want. All your projects are stored in the cloud, so you can open and edit your projects on any of your devices.
Yes, we do. We have lots of videos, tutorials, and help articles available to get you going. And if you want to get help from a human, just reach out to our friendly customer service team and they will help get you going.
As a start, we recommend checking out our Help Center, which is packed with detailed How-to articles to help you along. If you don't find the information there or want to enquire about something else, you can always contact our friendly customer service, and someone will get back to you shortly.
"I started using RoomSketcher and all of a sudden life just became less stressful. I find RoomSketcher just so user friendly, which saved me months of my study time."
"I prefer to use RoomSketcher because it is easy to work with, you can immediately see your design in 3D and it has everything you need."

"This software is epic. I’ve been using it for class projects and it works so well! I’ve recommended it to all of my classmates!"