Easily Visualize Home Improvement Projects With RoomSketcher
With RoomSketcher it’s easy to plan and visualize home improvement projects. Create floor plans and stunning 3D visuals at an affordable price.

“I have been using RoomSketcher for 4-5 years now, and I am incredibly happy with the software and their service. The 3D renderings I can present to my clients really blow their minds, and is a great competitive advantage for me in winning jobs. I highly recommend them to anyone who needs impressive visuals at an affordable price.”
Joseph Thomas
Home Renovation Consultant
Use RoomSketcher to Present your Home Improvement Projects

Save Time With an Interactive Floor Plan Solution
Home improvement projects often go through several iterations. With RoomSketcher you have an affordable and easy-to-use floor plan and design software that simplifies the inevitable back-and-forth. No need to redraw complete plans and reorder 3D visuals – you can quickly update them yourself right in the software.
Easily create high-res rendering and professional layouts in 2D and 3D - complete with measurements and annotations. This saves you time both in the lead-up to the project and once the project is finalized, and reduces surprises once the project is complete.

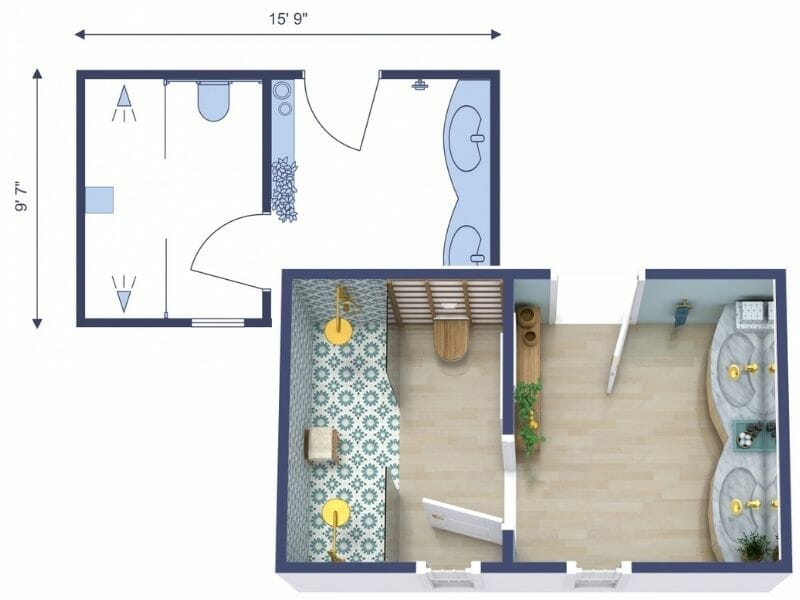
Use Floor Plans to Create "Before" and "After" Images
Measure the space and create the floor plan in the RoomSketcher App. Then create new versions to show how the space can be changed. From simple bathrooms to entire floors, with RoomSketcher you can do it all.
Add furniture and fixtures to help visualize the end-result. Add key measurements to help your contractors, and add the floor plans to complement your proposals.
Create a Visual Game Plan With Detailed 3D Photos
Make it easy for everyone to understand the changes that are to be made. Be it your partner, client or contractor. Once you have landed your layout, you want to make sure the final result lives up to the plan.
Create virtual 3D images that show key details like the placement of fixtures, accessories, and details. You no longer need to worry about the contractor misunderstanding which way the tiles should go - you have the 3D Photos that show it.
5 Steps to Your Successful Home Improvement Project

Step 1: Create a Floor Plan of the Room or Area
Measure the room you are working on and then draw it up in the RoomSketcher App. Handy wall measurements make it easy to get the exact lengths.
Not sure how to get your project going? Start with the basics - learn how to draw a floor plan.

Step 2: Add Doors, Windows, and Stairs
Next, add doors, windows and stairs. Measure windows to get the correct width, and easily adjust the sizes in the software. Set the height above the floor for windows, and choose the correct door swing angle.

Step 3: Start Furnishing and Decorating
Now that your layout is ready, it’s time to start designing. Add a wall color, or how about wallpaper. Add your flooring, and then start furnishing and decorating. With RoomSketcher Pro, you have more than 10.000 items available at your fingertips.
Create copies of the rooms and try different layouts to see what works best for your client. With instant 3D Snapshots you can visualize your project as you go.
Step 4: Finalize Your Layout and Present With Floor Plans
With a Pro subscription you can generate high-quality 2D and 3D Floor Plans at the touch of a button.
Add measurements and annotations to your floor plans with ease. Then print and download to scale in metric or imperial scales and in multiple formats such as JPG, PNG, and PDF.

Step 5: Create Beautiful 3D Renderings
Buy Pro to visualize the project in impressive 3D. Just use the virtual camera in the software to click and generate impressive 3D Photos and 360 Views. Your client can even walk around in interactive Live 3D, giving them a true feel for the space before it's even built or renovated. Live 3D updates instantly if you make a change to your design, with no waiting or downtime.
Frequently Asked Questions
The RoomSketcher App works on Windows and Mac computers, as well as iPad and Android tablets. Download the RoomSketcher App to as many devices as you want. All your projects are stored in the cloud, so you can open and edit your projects on any of your devices.
Yes, we do. We have lots of videos, tutorials, and help articles available to get you going. And if you want to get help from a human, just reach out to our friendly customer service team and they will help get you going.
As a start, we recommend checking out our Help Center, which is packed with detailed How-to articles to help you along. If you don't find the information there or want to enquire about something else, you can always contact our friendly customer service, and someone will get back to you shortly.